In approximately one week and 50 minutes, 'll be walking across the stage to accept my diploma from Georgetown University. I wanted to take this semester in particular to celebrate my time here and prepare myself for the future. And so my blogging deliberately lapsed. I saw this blog as a way to escape from the daily grind that will characterize my post-graduation life, and that is a conception that remains.
This post marks a recommitment to post-graduation blogging plans and a rethinking of my blogging process and theme.
Saturday, May 14


Friday, January 7
Pasta Inspiration

My initial inspiration was carbonara pasta, which I deconstructed a bit. I had red leaf lettuce that I wanted to use up so I cut that in a chiffonade and used in place of the peas that I always include in my carbonara. I diced up the prosciutto and cooked that until crispy, using the rendered fat, and a bit of olive oil, to cook the onion and garlic. I added the prosciutto and pasta to the onions and garlic. While I poached the egg I added the lettuce so it would wilt slightly from the residual heat. I topped the pasta with the poached egg and Parmesan shavings.
The runny yolk coated the pasta very nicely and tasted great with the sweetness of the onions and garlic ad saltiness of the prosciutto. I thought it was reminiscent of a carbonara, sans the butter (which I was going for).
Penne with Red Leaf Lettuce, Red Onion, Prosciutto, Poached Egg and Parmesan Shavings
Wednesday, January 5
Breakfast Smoothies
I've been on quite a smoothie kick lately. With the added green powder, I know that I'm getting my daily vegetable servings in one glass, and the brown rice protein powder also enhances the nutritional aspect and is being dairy and gluten free, two things that I have to be more mindful of in my diet, apparently. The ingredients are few, the flavors solid and they are very filling (a tablespoon or so of ground flax would definitely add to the fiber filling-ness). Here are a few of my recent recipe developments.
Blueberry-Almond Smoothie
Ingredients
1 C frozen blueberries
1 C almond milk
1 t almond extract
1 T brown rice protein powder (vegan and gluten free)
1 T green food powder (I use Amazing Grass Green Powder, which you can get on Amazon)
Method:
In order to get a smoother product, incorporate the two powders into the almond milk. Add the extract and blueberries. Blend until smooth. (If you require a sweeter product, add a bit of stevia to taste, but I prefer not to.)
Ginger-Peach Smoothie
Ingredients
Blueberry-Almond Smoothie
Ingredients
1 C frozen blueberries
1 C almond milk
1 t almond extract
1 T brown rice protein powder (vegan and gluten free)
1 T green food powder (I use Amazing Grass Green Powder, which you can get on Amazon)
Method:
In order to get a smoother product, incorporate the two powders into the almond milk. Add the extract and blueberries. Blend until smooth. (If you require a sweeter product, add a bit of stevia to taste, but I prefer not to.)
Variations
- Raspberry or Blackberry for blueberry
- Coconut milk yogurt (6 oz) or 1 C (light) coconut milk or rice milk or coconut milk beverage for almond milk
- Vanilla extract for almond extract, or no extract at all
Ginger-Peach Smoothie
Ingredients
1 C frozen peach slices
1/2 inch ginger, finely diced
1 C coconut milk beverage (So Delicious makes coconut milk, as well as coconut milk yogurt which I feature in other smoothie recipes, both which you can acquire at Whole Foods)
1 t almond extract
1 T brown rice protein powder (vegan and gluten free)
1 T green food powder (I use Amazing Grass Green Powder, which you can get on Amazon)
Method:
In order to get a smoother product, incorporate the two powders into the coconut milk. Add the ginger and peach slices. Blend until smooth. (Once again, if you require a sweeter product, add a bit of stevia to taste.)
Variations
- Mango chunks for peach slices
- Coconut milk yogurt (6 oz) or 1 C (light) coconut milk for coconut milk beverage
- Vanilla extract for almond extract, or no extract at all
Recipes I hope to try out later
- coconut-avocado
- cucumber-avocado-basil/mint
- pineapple-mango
- blueberry-raspberry-blackberry
- Cacao/Dark Chocolate (+ Coconut)
Monday, January 3
Basic Cooking Skills
I was reading one of my favorite cooking blogs, The Kitchn, when I came across a post about basic cooking skills that all beginners should know. I wanted to share this with you all and spend the next couple of days going through each technique so that you can slowly begin to add to your kitchen repertoire.

image via eoiguada.info
Bourdain’s basic argument, which has also been made elsewhere, is that every person should have the basic knowledge and skills to feed themselves a decent meal. This is knowledge that has been gradually lost with the demise of home ec classes in school and the convenience of pre-made grocery store meals.
Of course, no one really wants a return to the fussy, boring home ec classes of yore. (Yes, I’m old enough that I remember these!) So Bourdain’s idea is to make cooking cool. Or more to the point, to make not cooking decidedly un-cool. Wouldn’t it be great, he says, if in the future “it’s the kid who can’t roast a chicken who should be considered the ‘spaz.’”
But back to those basic skills. Here’s what Bourdain thinks everyone should know:
• Chopping an onion
• Making an omelet
• Roasting a chicken
• The correct way to grill and rest a steak
• Cooking vegetables to desired doneness
• Making a vinaigrette
• Shop for fresh produce
• Buying a fish, cleaning it, and making it
• Roasting meat
• Roasting and mashing potatoes
• Braising meats and vegetables
• What to do with bones (a.k.a. How to make stock)
• Making an omelet
• Roasting a chicken
• The correct way to grill and rest a steak
• Cooking vegetables to desired doneness
• Making a vinaigrette
• Shop for fresh produce
• Buying a fish, cleaning it, and making it
• Roasting meat
• Roasting and mashing potatoes
• Braising meats and vegetables
• What to do with bones (a.k.a. How to make stock)
New Year, More Posts?
I hate New Years Resolutions. I usually don't even think to make any until after the New Year and by then it seems as though there is no point. Same thing happened this year, and so I have no substantive or well-throughout plans to better myself throughout 2011.
I, surprisingly, have enjoyed my time at home. I've relaxed, slept late, tried to overhaul some of the horrible eating that occurs at my parents' home (fries and chicken wings for breakfast, chips for breakfast and waffles for lunch and dinner -- some of the more incriminating occurrences). Now I think it's time to get back on that blogging tip.
I am heading into this last semester with no meal plan and a goal to overhaul my grocery budget. And so there is lots to look forward to for this new year. I've got more recipes in development, shortcuts for cooking, tips for shopping and menu planning, and more.
On that note, let's hope for more willpower this year and happy new year,!
I, surprisingly, have enjoyed my time at home. I've relaxed, slept late, tried to overhaul some of the horrible eating that occurs at my parents' home (fries and chicken wings for breakfast, chips for breakfast and waffles for lunch and dinner -- some of the more incriminating occurrences). Now I think it's time to get back on that blogging tip.
I am heading into this last semester with no meal plan and a goal to overhaul my grocery budget. And so there is lots to look forward to for this new year. I've got more recipes in development, shortcuts for cooking, tips for shopping and menu planning, and more.
On that note, let's hope for more willpower this year and happy new year,!
Sunday, November 28
15 Minute Shrimp and Bean Stew
One of the best things I did was buy 1/2 pound bags of different types of beans when I was at the bulk section at Whole Foods sometime toward the end of the summer. I spent a day soaking and cooking all of the beans, and then freezing them on a pan, so I could store them in the freezer to be thrown into a soup or stew at any time. A can of beans can be used in place of the frozen ones that I keep at home. Either way this is a nutritious and delicious Mediterranean-style meal, perfect for chilly autumn evenings

15-Minute Shrimp and Bean Stew
Yields 4 Servings
Ingredients:
2 tbsps olive oil
3 cloves garlic, sliced very thin
1 cup diced tomatoes
2 cups water
1/2 tsp red pepper flakes
1 tsp dried thyme, or 3-4 sprigs of fresh
1 C chickpeas
1 C white cannellini beans
1 pound raw shrimp, peeled and deveined (optional: cut shrimp in half)
1 lemon, juiced (~1 T)
salt and fresh ground black pepper to taste
Method:
In a large saucepan, heat the olive oil and garlic slices on medium-low heat, until the garlic begins to sizzle. Cook for about 1 minute, being careful not to brown the garlic. Add the tomato sauce, water, pepper flakes, thyme, and beans. Turn up heat to medium-high and simmer for 10 minutes, stirring occasionally.
Stir in the shrimp, and simmer for 3-4 minutes, until the shrimp are cooked. Turn off the heat, add the lemon juice, and season with salt and pepper. Serve hot in bowls with bread.
Alternatives:
The shrimp could easily be substituted with langoustines, fish, scallops, or chicken.

Stir in the shrimp, and simmer for 3-4 minutes, until the shrimp are cooked. Turn off the heat, add the lemon juice, and season with salt and pepper. Serve hot in bowls with bread.
Alternatives:
The shrimp could easily be substituted with langoustines, fish, scallops, or chicken.
Monday, November 22
Turning Mike into a Cook

Over the summer, I did all of the cooking. But Mike is taking some of his first forays into the kitchen, in a capacity beyond my hyper-observant and not-so-helpful sous chef.
Thursday, November 18
How to Poach an Egg in a Microwave
I love topping a salad with a poached egg, flirting with normal conceptions of breakfast and lunch in the morning. As per the suggestions of this post, I need to experiment more with lentils, and the poached egg on top with be a nice and familiar touch. I've always cooked my eggs on the stove top, using salt and the vortex method, however they always inevitably get stuck to the bottom of the pan and I have to maneuver a bit to prevent the yolk from breaking and spilling out. So it was fortunate that I came across this simple how to post on poaching eggs in a microwave.


 Huge caveat, before you try this: Remember that microwaves come in lots of different configurations. This is a basic set of instructions but you will probably need to tweak it a bit to adjust to your microwave.
My kitchen is quite small and the microwave takes up a significant amount of counter space, so I've been trying to use it more often. This includes quick-steaming vegetables, sweet potatoes, as well as swordfish (2 minutes on high with a bit of olive oil, lemon juice, slat and pepper, continue from there for 30 second bursts until it flakes). And now it's time to step up my game to poached eggs.
This tip is also very useful to those still living in dorms as most common rooms are outfitted with microwaves. I'm su re there is a way to cook both the eggs and the lentils using a microwave and I'll explore those microwave-compatible-meals a little more in the future.
For now, enjoy this post, originally from The Kitchn, a great cooking and kitchen resource with many other affiliated blogs.
How To Poach an Egg in the Microwave
I don't usually use the microwave to poach my breakfast egg, but it can come in very handy for a lunch egg. Lentils, brown rice, or a salad can be elevated from a side dish to a main dish with a tender, gooey poached egg on top. Here's how to make a quick, freshly poached egg in the office microwave.
Huge caveat, before you try this: Remember that microwaves come in lots of different configurations. This is a basic set of instructions but you will probably need to tweak it a bit to adjust to your microwave.What You Need
Ingredients
1 egg
1/3 cup water
Approximately 1/2 teaspoon vinegar (optional)
1 egg
1/3 cup water
Approximately 1/2 teaspoon vinegar (optional)
Equipment
Microwave
Microwave-safe mug or small bowl
Microwave-safe small plate
Slotted spoon
Microwave
Microwave-safe mug or small bowl
Microwave-safe small plate
Slotted spoon
Instructions
1. Gather your ingredients. The vinegar is optional, but it will help the egg coalesce a little better.
2. Crack the egg into a microwave-safe bowl or mug.
3. Pour in about 1/3 cup water.
4. Add a bit of vinegar. (You can also add this directly to the water before pouring it in.)
5. Cover the bowl or mug with a microwave-safe plate. Place in the microwave and cook on 80% POWER for 60 seconds. Check the egg. If it is not done yet, return to microwave and cook on 80% POWER in 20 second bursts. (I usually cook mine for a total of 80 seconds.)
6. Remove from the water with a slotted spoon, and enjoy!
Additional Notes:
• This method will give a rather wobbly egg. If you like a more hardboiled-style egg, microwave on HIGH for 60 seconds.
• Do note that, unlike when poaching eggs on the stovetop, the microwave tends to cook the yolk even faster than the white. So if you like gooey yolks, it's best to take the egg out when the white is still a little wobbly.
• This method will give a rather wobbly egg. If you like a more hardboiled-style egg, microwave on HIGH for 60 seconds.
• Do note that, unlike when poaching eggs on the stovetop, the microwave tends to cook the yolk even faster than the white. So if you like gooey yolks, it's best to take the egg out when the white is still a little wobbly.
Spaghetti Squash Au Gratin
I had a spaghetti squash sitting on one of the shelves in my dining room for about a month (embarrassingly enough). Eventually I figured it was time to cook it, praying that it hadn't gone bad. Luckily, after an hour of baking, it shredded into perfect strands, which I promptly threw into a Pyrex bowl. I spent the next few days trying to think of a couple methods of preparation. I settled on a gratin after seeing a recipe for spaghetti squash gratin with basil in the Recipes for Health column of the New York times.
Spaghetti Squash Gratin with Basil
 In this image, the squash was cute width-wise, rather than length-wise, which I prefer.Image via Wikipedia
Ingredients:
4 C spaghetti squash
Spaghetti Squash Gratin with Basil
 In this image, the squash was cute width-wise, rather than length-wise, which I prefer.Image via Wikipedia
Ingredients:
4 C spaghetti squash
1 tablespoon extra virgin olive oil
1 medium onion, finely chopped
2 garlic cloves, minced
1 t salt
1 t pepper
3 egg yolks
1/2 cup non-fat milk
4 T basil leaves, diced
1/2 cup gruyere and swiss cheese blend (I got this blend from Trader Joe's, Gruyère on its own would be fine)
2 T grated Parmesan
Method:
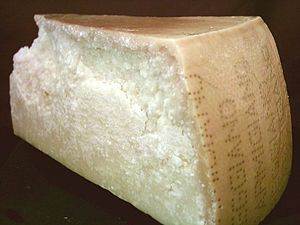 Image via Wikipedia
 Image via Wikipedia
Method:
Preheat the oven to 375 degrees. Slice the squash in half lengthwise. Remove the seeds. Bake for one hour. Remove from heat and let it cool. Run a fork through the flesh to separate the strands. Measure out 4 cups and then chop it coarsely.
 Image via Wikipedia
Heat a skillet over medium heat. Add the oil and onion. Cook until translucent. Add the garlic and salt. Cook until fragrant, then add the squash. Continue to cook until the strands of squash are a little more tender. Season to taste with salt and pepper, and remove from the heat.
Beat the egg yolks, add milk, salt, pepper and basil. Stir in the squash mixture and the Gruyère, and combine well. Pour the mixture into a well oiled baking dish (I used an 8-cup Pyrex bowl). Sprinkle the Parmesan or pecorino over the top, and gently press down to moisten.
 Image via Wikipedia
Bake 40 to 45 minutes, until browned. Let it cool for 10 to 15 minutes before serving. Serve as either a side or main dish.
| Nutrition Facts | ||||||
Serving Size 196 g | ||||||
Amount Per Serving | ||||||
Calories 194 Calories from Fat 113 | ||||||
% Daily Value* | ||||||
Total Fat 12.5g 19% | ||||||
Saturated Fat 4.8g 24% | ||||||
Cholesterol 175mg 58% | ||||||
Sodium 703mg 29% | ||||||
Total Carbohydrates 12.6g 4% | ||||||
Dietary Fiber 0.7g 3% | ||||||
Sugars 2.9g | ||||||
Protein 9.2g | ||||||
| ||||||
Nutrition Grade B- | ||||||
* Based on a 2000 calorie diet |

Wednesday, November 17
Quick and Easy Udon Noodle Soup with Fried Bean Curd Sticks
Soup is one of my favorite dishes to eat, particularly in the winter when you want a hearty meal done quickly, so you can go back to your couch and comforter as soon as possible. I had lots of bean curd sticks (basically, they are the dried skins off the top of soy milk) and wanted to find a way to apply them in a soup. I chose a Japanese Udon soup, as I felt Asian flavors would be the best compliment to the bean curd, and from there it was simple, thinly slicing and chopping whatever vegetables I had in my fridge. And the result is this highly customizable noodle soup.

Udon Noodle Soup with Fried Bean Curd Sticks
Serves 1 (simply multiply each ingredient by 4 to determine the individual yields)
Ingredients:
1 oz bean curd sticks (I soaked mine for 20 minutes, but they can be fried as is) (can be replaced with 1/2 a serving of any other kind of protein)
1 C canola or peanut oil (or enough to cover 1/2 in of the bottom of a shallow pan)
2 oz Udon Noodles
1 C (Vegetable/Chicken/Fish) Stock
1 T miso
1 t mirin
1 T soy sauce
1/2 carrot, sliced
1/2 C broccoli, chopped
1/4 C leeks, sliced
1/4 cup cubed tofu
Method:
Heat the oil over medium heat until just before it smokes. Add the bean curd sticks and fry on either side until golden brown. Set aside on paper towels to drain the oil.
Cook the udon noodles according to the package directions. Drain and set aside. In the same pot add the stock, miso, mirin and soy sauce and bring to a boil. Add the vegetables and tofu and cook for 2-3 minutes, just enough so that they are still slightly raw and crunchy.
Put the noodles in a bowl and pour the stock and vegetables over them. Top with the bean curd sticks, serve, and enjoy.


Subscribe to:
Posts (Atom)
LinkWithin
